How to Install a Toilet Seat A Comprehensive Guide
Installing a toilet seat may seem like a simple task, but doing it correctly ensures comfort, safety, and longevity. Whether you're replacing an old, worn-out seat or upgrading to a new style, this step-by-step guide will walk you through everything you need to know.
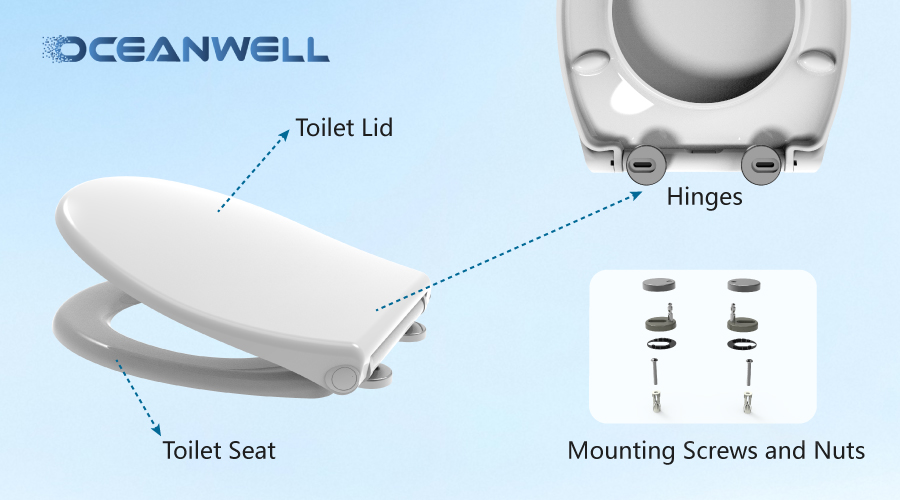
① Understanding the Components of a Toilet Seat
A standard toilet seat assembly consists of several key parts:
- Toilet Seat: The part you sit on, usually made of plastic, wood, or resin.
- Toilet Lid: The cover that closes over the seat, often attached with hinges.
- Hinges: Metal or plastic mechanisms that connect the seat and lid to the toilet bowl, allowing them to lift and lower.
- Mounting Screws and Nuts: These secure the seat to the toilet bowl. They may be visible on top or hidden underneath the bowl.
- Washers: Small rubber or plastic discs that prevent leaks and secure the screws tightly.
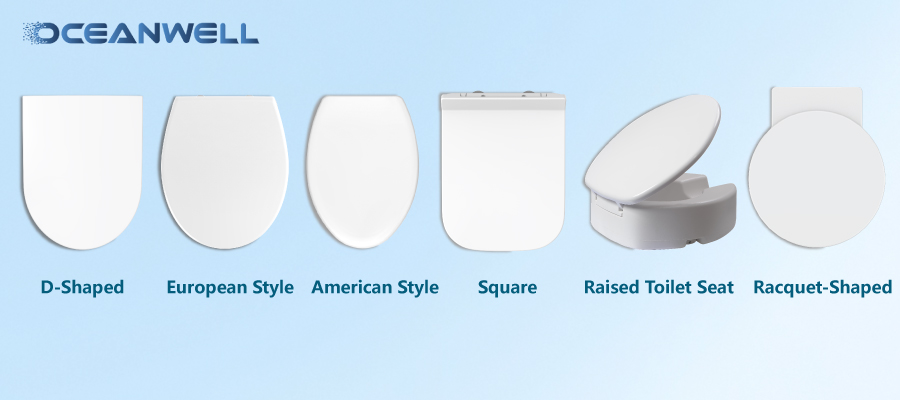
② Shape Classifications
Toilet seats come in various shapes to fit different toilet bowls. The most common include:
- D-Shaped Toilet Seat: Resembles the letter "D," with a straight back and curved front. Popular in modern bathrooms.
- European Style Toilet Seat Cover: Typically more compact and rounded, designed to fit European-standard toilet bowls.
- American Style: Generally larger with a more elongated or oval shape, matching most American toilet models.
- Square Toilet Seat: Features sharp, straight edges for a contemporary look, often paired with square toilet bowls.
- Trapezoidal: Has a slightly tapered shape, wider at the front and narrower at the back.
- Racquet-Shaped: Combines rounded edges with a subtle angular design, similar to a tennis racquet.
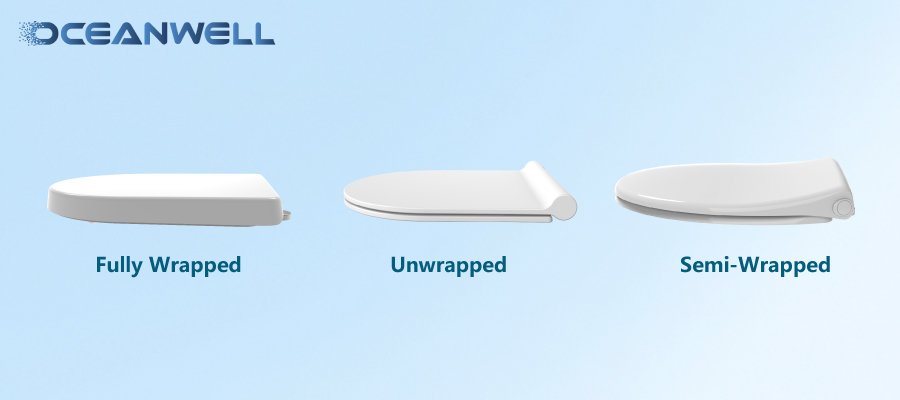
③ Differences Between Unwrapped, Semi-Wrapped, and Fully Wrapped Designs
These terms refer to how the seat covers the toilet bowl's rim:
- Unwrapped: The seat sits directly on the bowl's rim without extending over its edges. It’s simple but may leave more of the bowl exposed.
- Semi-Wrapped: The seat partially covers the front edge of the bowl, offering a balance between coverage and simplicity.
- Fully Wrapped: The seat completely covers the bowl's rim, providing a seamless look and better hygiene by reducing gaps where dirt can accumulate.
④ How to Choose the Right Toilet Seat
Selecting the perfect toilet seat involves considering these factors:
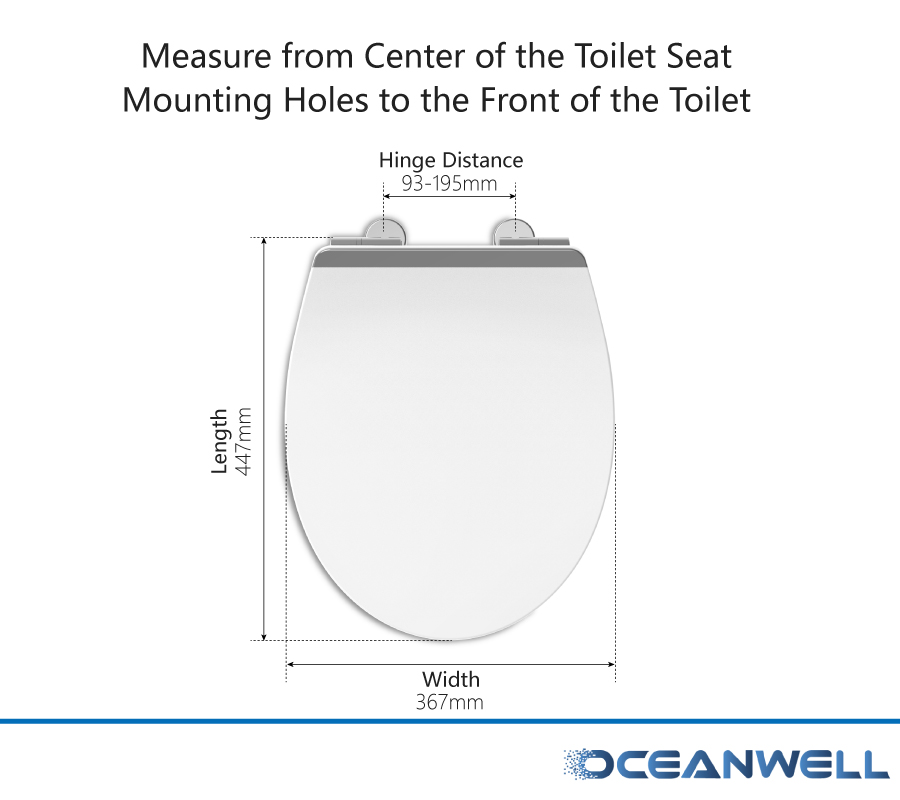
- Measure Your Toilet: Check the length and width of your toilet bowl to ensure a snug fit. Measure from the bolts (where the seat attaches) to the front of the bowl.
- Material: Plastic seats are affordable and easy to clean; wooden seats offer warmth and style; resin seats are durable and resistant to stains.
- Features: Opt for soft-close hinges to prevent slamming, quick-release mechanisms for easy cleaning, or antibacterial materials for added hygiene.
- Style and Color: Match the seat to your bathroom decor. White and off-white are classic, while bold colors or patterns can add a unique touch.
⑤ Essential Tools and Installation Steps
Tools You’ll Need:
- Screwdriver (flathead or Phillips, depending on the screws)
- Adjustable wrench
- Pliers (optional, for stubborn nuts)
- Cleaning cloth
- Mild cleaner
Installation Steps:
1. Remove the Old Seat:
- Locate the mounting screws (either on top of the bowl near the hinges or underneath).
- Unscrew the nuts (you may need to hold the screw from above while turning the nut below).
- Lift off the old seat and lid.
2. Clean the Area:
- Wipe the mounting area with a mild cleaner to remove dirt, grime, and old residue.
3. Align the New Seat:
- Place the new seat on the bowl, ensuring the hinges line up with the mounting holes.
- Insert the screws through the holes (from top to bottom).
4. Secure the Seat:
- Screw the nuts onto the bolts from underneath. Tighten them firmly but not too much to avoid cracking the bowl.
- Check that the seat is level and doesn’t wobble. Adjust if necessary.
5. Test the Seat:
- Lift and lower the seat and lid a few times to ensure they move smoothly and stay in place.
⑥ Daily Care for Your Toilet Seat
- Regular Cleaning: Wipe the seat with a damp cloth and mild soap weekly. For deeper cleaning, use a disinfectant spray or wipes.
- Avoid Harsh Chemicals: Abrasive cleaners or bleach can damage the seat’s finish over time.
- Check for Loose Screws: Tighten the mounting screws periodically to prevent wobbling.
- Handle with Care: Avoid slamming the lid, even with soft-close hinges, to extend their lifespan.
By following these steps and selecting a seat that fits your needs, you’ll enjoy a more comfortable, hygienic, and visually appealing bathroom. For advanced options, consider smart toilet seats with heated surfaces or bidet functions—just ensure they’re compatible with your bowl’s dimensions.